![]()
![]()
![]()
![]()
![]()
![]()
![]()

|
|
|
Our Best Bluebird Feeder by Fawzi P. Emad and Haleya Priest
It took Haleya several months of experimentation and research to find the right size of openings for this feeder. The size of the entrances is very critical for the success of the feeder. Then Fawzi took her results and made plans for a practical feeder and tested it. It was such a success, both Fawzi and Haleya have been using it with very encouraging results. It prevents the bigger birds like Mocking Birds, Catbirds, and Starlings from entering, and at the same time permits the smaller birds to go in to eat! It is much easier to train the Bluebirds to find the mealworms and suet in this type of feeder than in any other covered feeder we have used! You can use any kind of wood you happen to have if the kind specified below is not available in your area. Wood dimensions given below are nominal, for example a 2x4 is actually 1.5" by 3.5". Similarly for the 1" stock (it is in reality ¾" thick.) Other dimensions are exact (like the size of entrances, spaces, and lengths.) General
Description.
Bluebirds can enter this feeder on all four sides.
Two sides have a “lattice” with rectangular openings or windows,
the back side has two round holes, and the front side has a Plexiglas pane
with a long entrance above. This
Plexiglas can be easily removed for cleaning the feeder.
The top of the feeder is hinged so it can be open to place the food. The whole feeder or “cage” is mounted on a metal pole
driven into the ground.
Parts Needed. The
parts needed are described in the table above.
The thin stock for the lattice is ripped from 1” stock (actually ¾”.) We highly recommend using solid brass screws, hinges and
hook-and-eye. Assembly Instructions. Those
items marked with an asterisk (*) are optional since you may not have the
tools to perform the operations needed. Omitting
such steps will not reduce the effectiveness of the feeder.
All sizes are in inches.
1.
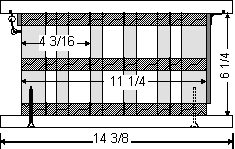
Cut the top and
bottom to size: 1 x 12 stock, cut two pieces each 14-3/8 long.
2.
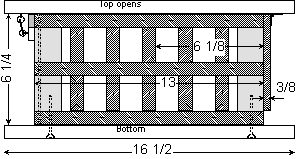
(*) On the underside
of the “roof” make grooves 1/8 deep 3/8 to 1/2 from the edges as shown in
the figure to the right. The
purpose of these grooves is to prevent rain from entering to the center of the
feeder by acting as rain stops.
3.
Make a groove in two
of the four corner pieces for the
4.
Side assembly.
start with two corner pieces (1.5 x 1.5 x 6.25) one with a
groove and note the position of the groove, it should face away from the
lattice towards the center (see figure on right.)
The three long lattice pieces (0.25 x 0.75 x 11.25) are attached to the
two corner pieces using
5.
Make a jig for
spacing the vertical lattice pieces. This
is a piece of wood 1-5/16 inches wide (the horizontal space for the
entrances.) On the inside, start
by placing a vertical lattice piece exactly 4-3/16 from one end (as shown)
using three ½ inch #6 screws (the heads of the screws will be on the inside,
not visible from the outside. Do
not forget the pilot holes and countersinks.)
6.
Using the spacer jig,
place the other vertical pieces as shown.
This should produce six windows exactly 1-5/16 inches wide.
The remaining space will form four other windows near the corners which
are too narrow for any birds to go through.
7.
Assemble a second
side in a similar manner. Make
sure the groove in one corner (for the Plexiglas) faces away from the lattice
(see figure below).
8.
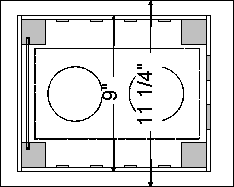
Place the two sides,
grooves facing each other as shown above.
Center the two sides on top of the bottom piece and make sure they are
9 inches apart (outside measure.) Mark
their position on the board using a pencil.
Drill and countersink four holes at the center of each corner.
Put a generous amount of waterproof wood glue under each corner piece,
then drive the four #10, 2 ½ inch screws, one in each corner. You should put a pilot
hole through each corner before you drive the screws in the corners.
9.
Make two entrance
holes in the back plate. These
should be 1.5 inches in diameter placed as shown.
If you own a planer, it is nice to use thinner
10.
Attach the ¼ x ¾ x
9 inch piece at the top front corners in order to hold the posts securely.
Use 1” #6 screws and don’t forget to make pilot holes with
countersinks for the screw heads.
11.
Attach the top using
the two hinges. The screws should
be attached to the underside of the top first, then into the back.
Mark the hinges then drill pilot holes for the screws.
12.
Attach the two hook
and eye in the front as shown in the figure below.
If the hook is too tight, open it a little with pliers.
If too loose, tighten it a bit so it fits snugly but will go in and out
of the eye screw with ease.
13.
Make the feeding tray
using the ¾ x 5-¼ x 10 inch piece. Using a band saw cut two holes for the cat food cans as shown
and glue and nail the two ¾ x ¾ x 5 inch “legs” as shown in the two
figures on the right. The nails
should be small wire brads to hold the pieces as the glue dries.
If you do not have a band saw, then omit the holes and “legs” and
nail the two cans onto the feeding tray.
14.
Cut a piece of
Plexiglas to fit in the grooves in the front.
It should be just about 1/8th of an inch smaller than the
grooves allow. This permits
sliding the Plexiglas out for cleaning the inside of the feeder.
The height of the Plexiglas should be 4-3/8 inches.
Tape electrical tape on it so the birds know it is not an exit window.
They can go in and out above the Plexiglas.
Fold a piece of electrical tape over the top edge of the Plexiglas to
make it visible.
15.
Attach the ½”
galvanized floor plate to the center of the bottom using the ¾” #10 screws.
This will allow the feeder to be attached to a ½” galvanized water
pipe driven into the ground to a suitable height (best is to make it at eye
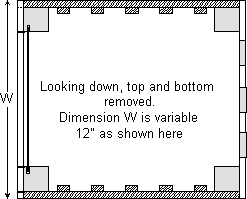
level.) The figures below show the completed feeder. Both a top view looking down inside the feeder and a view looking at the side are shown.
Larger version. We have also built a larger version along the same lines. Without much detail, the diagrams for a larger version are shown below. Besides having a larger area, it has three round entrances in the back and four windows on each side. The smaller version allows two birds to feed at one time while the larger one can have as many as six birds at the same time (assuming they can get along!)
If
more details are needed, please contact one of the authors, by e-mail,
Fawzi P. Emad: emad@eng.umd.edu
or femad<at>fpemad.com, and Haleya
Priest: MaBlue@gis.net. It is highly recommended that a predator guard be added below the feeder to prevent ground animals from reaching it. The best one is the Ron Kingston predator guard. It should be mounted right below the feeder. To see plans in an article written by Ron, go to: http://audubon-omaha.org/bbbox/nabs/rk1.htm.
|
|
Please feel free to send me, Fawzi Emad, any corrections, observations, comments or questions. Thank you! (The tail feather on the left is from Koko, our Blue-Front Amazon Parrot.) |
 Plexiglas to slide into.
 six 1” #6 screws as shown in the figure on the right.
 wood by planing it down to 3/8 inches thick.